Author name: Freek

How to migrate between Synology NAS (DSM 6.0 and later)

Recently I bought a Synology DS216j to replace my Synology DS214se. The DS214se is a good entry-level NAS for personal use, but it was struggling to keep up with my 3 HD IP-cameras as well as acting as a Mail Server, mainly because of the single-core CPU. Since I didn’t want to lose my data, I had to perform a migration from the DS214se to the DS216j in order to retain the data. A quick Google search lead me into this Synology knowledge base article: https://www.synology.com/en-us/knowledgebase/DSM/tutorial/General/How_to_migrate_between_Synology_NAS_DSM_5_0_and_later

The title of the knowledge article above says that it’s intended for Synology NAS running DSM 5.0 and later. At the point of writing, DSM 6.1 is the latest available DSM version, so I had a suspicion that the knowledge base article might be out of date. Because my NAS models were not identical to each other, I had to follow section 2.2. of the article linked above; Migrating between different Synology NAS models. After doing so, I can confirm that my suspicions were right; the knowledge base article is out of date, the migration process between two Synology NAS just got easier!

Here’s a small writeup about what has changed in migrating between Synology NAS between DSM 5.0 and DSM 6.0:


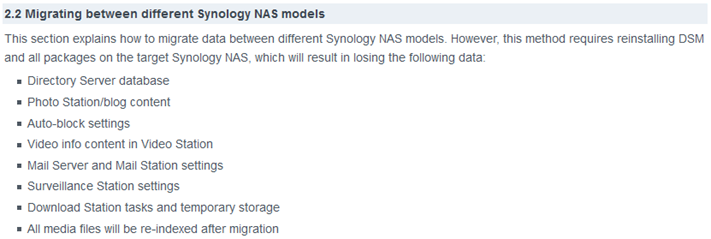
Section 2.2. Migrating between different Synology NAS models starts with a word of caution, telling you that all packages on the target Synology NAS (i.e. your new NAS) will have to be reinstalled, which results into in losing the following data (…) Mail Server and Mail Station settings & Surveillance Station settings. This was applicable to my Synology NAS, as I had these packages installed and were actively used. However, after performing the migration to my new NAS as described in Section 2.2. (which basically comes down to update your old NAS to the latest DSM, switch it off, swap the drives to the new NAS and turn it on) my new Synology said the packages had to be repaired instead of being reinstalled. After clicking the repair button, all my packages came back to life on the new NAS, without any data loss; all my settings and files, including from Mail Server, Mail Station and Surveillance Station (emails as well as recordings), were still there! Needless to say, it’s still good practice to backup you data before performing the migration, as described in section 1 of the knowledge base article linked above.

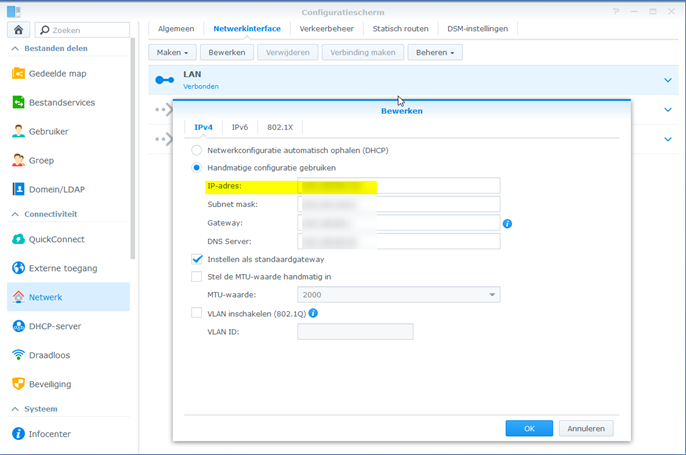
However, what did change was the IP address of my NAS. I assumed that my new NAS would be using the same IP as my old NAS, as Synology instructs you to turn off your old NAS before powering up your new NAS, but that was not the case. So after the migration, use the Synology finder to find the new IP of your NAS and change it to your old IP after the migration, which can be in the Control Panel à Network.

Also, lastly, I had to re-register my DDNS hostname by re-logging into my Synology account, which can be done in the Control Panel à External Access.

That’s all folks!

PS. Should you have bought any additional Surveillance Station license keys in the past, don’t forget them down and to deactivate them on your old NAS before the migration, since the license keys can only be active on one Synology product at a time. Also, as an FYI, each license key can only be migrated just once.

How to schedule a PHP script in Plesk for Windows using cronjob/crontab

Nowadays it’s dead easy to schedule a PHP script as a cronjob/crontab in Plesk Onyx for Windows. However, in the previous versions, Plesk did not supply a sample syntax for scheduled tasks. Most examples found on the interwebs assume that you’re running Plesk on Linux, but if you are like me and run Plesk on Windows, that syntax is just plain wrong.

This small ‘note to self post’ shows how to correctly schedule a PHP script in Plesk for Windows for those of you who are still running an older version of Plesk :)

Step 1. Open Plesk and search for Scheduled Tasks

Step 2. Create a new cronjob/crontab as shown above. Adjust the parameters to your liking. In this example, I’ve scheduled the particular .php script to run every 5 minutes of each day of the week.

Step 3. You’re done! In the end, your finished cronjob/crontab should look like in the image above. If desired, you can also run it on demand by clicking Run Now.

HostsMan: Pi-hole without the pi (DNS-based adblocker)

If you’re tired of AdBlock Plus slowing down your browser and you don’t have a spare Raspberry Pi lying around to run Pi-hole, HostsMan is a great alternative that runs on Windows. One way to keep malware and advertisements outside is to block the servers that serve this content. This can be done by adding the IP numbers of these machines into the hosts file and redirect them to ‘localhost’. Updating the hosts is time-consuming and prone to errors, but this is when HostsMan comes into play. This free program can retrieve current lists of websites known to serve advertisements and malware and combine with the existing hosts file. Furthermore, it checks the hosts file for incorrect, duplicate or malicious entries. It also features a built-in editor and can be used to empty the DNS cache.

Download link: http://www.abelhadigital.com/hostsman

Statsgen2

[Update 9-1-2017]  The statsgen.co.uk domain name got dropped because it wasn’t renewed. As of today, I’m the new owner of statsgen.co.uk to continue the legacy.

I’m currently in the process of migrating our Call of Duty 2 servers from Linux to Windows. Why? Well, I made a small oopsy which would take me a long time to fix, so I decided to migrate the COD2 servers to Windows, but let’s not go into details. If you must know, my /boot directory was full so I had to clean it up. Accidentally, I deleted the wrong kernel files, so the server didn’t want to boot anymore. Of course I could fiddle around with the rescue option my VPS had, but I was a bit tired of messing around with the command-line.

Anyway, we used to run our Call of Duty 2 servers before on Windows as well, back in 2010. The main advantage of running your COD2 servers on Windows is that you can use Statsgen2, a free statistics generator. Of course one can also use Statsgen2 with your COD2 servers running on Linux. You would just have to (automatically) FTP the logfiles over to your Windows box running Statsgen, but that would require 2 servers, which is silly. So naturally during the migration I decided to go and download statsgen2 from its official website statsgen.co.uk, just to find out that the website no longer exists :-(

Almost every link I tried on Google was dead, but in the end I managed to download a clean copy of statsgen2.zip. Those of you who have used statsgen2 in the past know that you need more than just the program itself; Without the imagepacks, your stats website will look like crap. Finding a working link to the imagepacks turned out to be a real pain in the ass. I couldn’t find a working link anywhere, so I had to use my reverse engineering skills to download the images from stats pages created by statsgen2 in the past. Basically what I did was search on Google for clans still hosting an (old) statsgen2 generated stats page and used DownThemAll to download all images on their stats pages. Doing so, I managed to recreate complete imagepacks for Call of Duty, Call of Duty 2, Call of Duty 4, Call of Duty 5, Wolfenstein: Enemy Territory and the base images (i.e. Home button etc).

According to the official website, archived by web.org, I am still missing the files for other games like MOHAA and Enemy Terrirory: QuakeWars but this was the best I could do. At least you have the files for the complete Call of Duty series and the program itself to get you started J Should you have these files, please email me so I can put them up for everyone else to download.


Statsgen 2 is a Statistics Generators for Call Of Duty 1/2/4/5, MOHAA, Spearhead, Wolfenstein/Enemy Territory and Quake Wars. Statsgen automatically downloads the server logfiles, processes them using a flexible template system, and then transmits the resultant webpages to the webserver. Templating allows the pages produced to be very flexible to fit in with the style of your clan website. Additionally, it can send messages to your game servers stating who are the top scorers (COD1, COD2, COD4, QuakeWars).

Download:

Latest Statsgen2 Release:
Version 1.9.3 (23 November 2009) – statsgen2.zip

Image packs:
Basic Statsgen Images – Required for all server types – statsgen2images.zip
COD 5 Specific Images – Supplied by Odin – cod5images.zip
COD 4 Specific Images – cod4images.zip
COD 2 Specific Images – cod2images.zip
COD 1 Specific Images – cod1images.zip
Wolfenstein: Enemy Territory Specific Images – wolfensteinimages.zip

Unzip the contents and upload them to the root of your statsgen2 output folder of your webserver.
Note: I am still missing the imagepacks for other games like MOHAA and Enemy Terrirory: QuakeWars but this was the best I could do. Should you have these files, please email me so I can put them up for everyone else to download.

Upgrade files:
No idea what these are for, but I saved them just in case. Personally I’ve never used/needed them.
cod5images.ini
cod4images.ini
cod2images.ini
cod1images.ini
mohaaimages.ini
quakewarsimages.ini
wolfensteinimages.ini

Custom Templates:
ArcadeKnight’s CoD2 Template

Installation:

Consult the included README.txt for a quick installation guide. Consult the detailed documentation, which can be found in the help.zip, for more information.
To get you started, it basically comes down to this:

– Create a directory statsgen2 and unzip its contents
Contents should include:
statsgen2.exe
help.zip
libmySQL.dll – This is a library used to connect to MySQL databases (Note: A MySQL compatible template is not included! I could not find a working download link)
statsgen2.ini
readme.txt
upgrade.ini – Upgrade files, used when upgrading from an older statsgen version to the latest one (Never used it myself).

– Run statsgen2.exe – On first run various files / directories will be created including the default templates. This can take a while, please be patient.

– Click on Run –> First Time Configuration – Again, this can take a while. DO NOT CANCEL THIS OR INSTALLATION WILL NOT COMPLETE

– Setup statsgen2 to your liking, upload the corresponding imagepack and you’re done!

Statsgen2 is even compatible with Windows Server 2012 R2! Just make sure to run it in compatibility mode (XP SP2/SP3) with Administrator privileges.
Additionally, I also had to hack together this .bat file, which basically just deletes the database before the stats are parsed. Else, my webpage would have missing data. Deleting the database before the statistics are parsed ensures the database is completely rebuilt from the start instead of being appended, which apparently gives issues on Windows Server 2012 R2. I’ve scheduled this .bat file using Windows Task Scheduler to be run before the stats are parsed:

taskkill /F /IM statsgen2.exe
del “D:\statsgen2\statsgen2.db”
“D:\statsgen2\statsgen2.exe”
exit

Disclaimer:

Statsgen2 is created by Shaun Jackson – [email protected]
I’ve mailed Shaun and requested permission to re-host the files. Sadly I never received a reply. It’s a great shame as many still use it since no one has created anything near as good.

How to: Fix an unbootable Intel SSD suffering from the 8MB bug

A friend of mine was having issues booting his laptop. The BIOS recognized his SSD, an Intel SSD sa2bw120g3a, but Windows was nowhere to be found. Even bootable partition and hard drive managers showed no sign of the SSD. This got me thinking that the SSD was dead, which was odd, as the BIOS was still recognizing it.

Several minutes of Googling lead me into the right direction; My friend’s SSD was suffering from the 8MB bug that was discovered in (almost all) Intel SSD firmwares, back in July 2011. As my friend never encountered issues with his SSD and wasn’t up to date about this fact, he never updated his SSD’s firmware, which could have prevented this bug from happening.

The 8MB bug is caused by an unexpected power loss under specific conditions. This will reduce the capacity of the SSD to 8MB and change the serial number to “BAD_CTX 0000013x”. Once this error occurs, no data on the SSD can be accessed and the user cannot write to or read from the SSD. The only way to get the SSD back to work is to erase it. That’s right, all data on the drive is permanently lost.

Some people have been able to start from scratch by wiping the drive’s contents with utilities such as HDDErase and Parted Magic but this only works if your SSD is not ‘frozen’. And since my friend has all the luck in the world, sure enough his SSD was frozen. Fixing a frozen Intel SSD suffering from the 8MB bug requires a more technical approach but it’s no rocket science once you know what you have to do. So, let’s get started!

You need:
– Hiren’s Boot CD / USB: http://www.hirensbootcd.org/files/Hirens.BootCD.13.2.zip
Update 21-11-2016: Mini Linux was removed from recent Hiren’s Boot CD versions. The last Hiren’s Boot CD to include Mini Linux is version 13.2 which you can download from the link above.
– Physical access to your SSD (i.e. open up your computer case)

1. Burn Hiren’s Boot CD to a CD or create a bootable USB stick, insert it into your computer and boot from it.

2. Select ‘Mini Linux’ from the menu and hit Enter.

3. Once Linux has loaded, right click on the wallpaper and select ‘Xterm

4. A command prompt / terminal should open. Enter the following command to get a list of all available harddrives in your computer:

 fdisk –l

Locate your Intel SSD in the list and take a note of the device name, for example /dev/sda

5. Type the command:

 sudo hdparm -I /dev/sdX

where  sdX  is your SSD device.
This command will just print out some info about the drive. If you see the following in the output:
Serial Number: BAD_CTX that confirms that you are hit by this bug.

If at the Security section it reads frozen you CANNOT continue, you have to use a workaround to eliminate the freeze before you can continue:
Unplug and then replug the SATA data cable of your Intel SSD while the system is still powered on. So, leave your computer powered on, open up your case, locate the SATA data cable of your Intel SSD, unplug it and then replug it. This should unfreeze your SSD.

6. Type the command:

 sudo hdparm --user-master u --security-set-pass SOMEPASS /dev/sdX

Again /dev/sdX is your SSD drive, and SOMEPASS is a password you want to set for the SSD. (This password doesn’t lock the SSD or anything similar, it is just needed for these low-level dealing with the SSD.) We will need that SOMEPASS later on, so remember it/write it down. (But after the secure erase this password will be reset anyway so it is not important in the longterm.)

7. Check the drive again:

 sudo hdparm -I /dev/sdX

Now it should say enabled and not frozen at the security section:Security:
Master password revision code = 65534
supported
enabled
not     locked
not     frozen
not     expired: security count
supported: enhanced erase

8. Type the command:

 sudo hdparm --user-master u --security-erase SOMEPASS /dev/sdX

This issues the secure erase command. Again /dev/sdX is your SSD, SOMEPASS is the password set before. The completion of this operation can take a few minutes. After this your SSD should be functional, if not, try again with this command:

 sudo hdparm –user-master u –security-erase-enhanced SOMEPASS /dev/sdX

This latter command takes much more time (30-40 minutes) and you will have to reset the password (with step 4.) before running it because SOMEPASS is likely already reset by the previous command.

9. After this check the drive again

 sudo hdparm -I /dev/sdX

The BAD_CTX thing should be gone and your drive should be functional. You can now reinstall your O/S. After all this don’t forget to update the firmware of the SSD using Intel SSD Toolbox to prevent the bug from happening again in the future.

Source & Credits: http://askubuntu.com/questions/409684/image-or-reset-broken-ssd

Scroll to Top